Capture what you see, hear and say. Hand it to an AI agent.
Startwell Capture is a free app for macOS, Windows and Linux, with an extension for Chrome. Screenshots with your notes, voice notes, meetings and narrated walkthroughs are filed by topic as you work, transcribed on your computer, and kept with what was on screen as plain folders. One shortcut copies a prompt that hands it all to Claude Code or any other agent.


curl -fsSL https://capture.startwellventures.com/install.sh | bash
It downloads the latest version, checks it, and puts Startwell Capture in Applications. Before macOS 26 it also fetches the speech model. Run it again any time to update. Read the script first, or download the .dmg.
irm https://capture.startwellventures.com/install.ps1 | iex
It downloads the latest version, checks it, installs Startwell Capture for you (no administrator needed) and fetches the speech model. Run it again any time to update. Read the script first, or download the installer.
curl -fsSL https://capture.startwellventures.com/install.sh | bash
It downloads the latest version, checks it, installs the .deb on Ubuntu and Debian or the AppImage anywhere else, and fetches the speech model. Needs glibc 2.39 or later: Ubuntu 24.04, Debian 13, Fedora 40 or newer. Run it again any time to update. Read the script first, or download the .deb or the AppImage.
Or in your browser
Startwell Capture for Chrome runs the whole loop in Chrome: screenshots with notes, voice notes, walkthroughs of a tab, packs and hand-off prompts. No desktop app needed.
Get the Chrome extensionComing to the Chrome Web Store. Until then, it loads from a folder.
Free. No account. What differs on each system · How it works

- Focus: where the next capture goes.
- Issues: what you raised while talking.
- Groups form by themselves from captures close together.
- Copy any capture for an agent with ⌘C or Ctrl+C.
- Hand off: press H and the prompt is ready to paste.
- Capture from any app: hold ⌘⇧ and press the letter; Windows and Linux have their own keys.
Three systems and a browser
The same app on macOS, Windows and Linux, with the same packs and hand-off. Windows, Linux and Chrome are new; where one can’t do what the Mac does, it says so here and in the app. On Windows and Linux, telling voices apart and smart titles are optional downloads in setup.
macOS
Apple silicon, macOS 15 Sequoia or later
- Install
- One line in Terminal.
- Speech to text
- Apple’s own transcriber on macOS 26 and later; Whisper before it, fetched when you install.
- Good to know
- Where it started: every desktop feature on this page works here.
- Telling voices apart and reading screen text are built in, with nothing extra to download.
Windows
newWindows 10 or 11, 64-bit
- Install
- One line in PowerShell. No administrator needed.
- Speech to text
- Whisper, on your PC, fetched when you install.
- Good to know
- Keys are Win+Shift, or Win+Alt+Shift where Windows keeps the letter for itself.
- Not code-signed yet, so the downloaded installer gets a SmartScreen warning. The PowerShell line doesn’t.
Linux
new64-bit Intel or AMD, glibc 2.39 or later: Ubuntu 24.04, Debian 13, Fedora 40 or newer
- Install
- One line in a terminal: the .deb on apt systems, the AppImage anywhere else.
- Speech to text
- Whisper, on your computer, fetched when you install.
- Good to know
- On X11 most things work as on Windows, but the app’s own panels can show in a recording.
- On Wayland, keys work only while the app is in front (a desktop key binding can start a capture), the desktop asks which screen to share until you choose one, page addresses need the browser add-on, and clicks in other apps aren’t seen.
Chrome
newChrome 116 or later, on any desktop
- Install
- Load it from a folder today. How
- Speech to text
- Whisper, in the browser. The model downloads once.
- Good to know
- Captures the tab you are in, not other apps, and has no meetings.
- Walkthroughs record the tab’s video once you let Chrome capture tabs. Chrome’s own pages and the Web Store can’t be recorded.
- Coming to the Chrome Web Store. Pairs with the desktop app if you have both.
How it works
You capture. The app decides where it belongs, groups it with what you just took and writes it to disk as a pack an agent can read. Then the hand-off is one paste.
A day with Startwell Capture
Most keys on this page are the macOS ones. On Windows ⌘⇧ is Win+Shift (Win+Alt+Shift for S, V, T and M), and on Linux Super+Shift (Super+Alt+Shift for S). The shortcuts page has every key for each system.
09:30
Stand-up
A meeting app starts using the mic, and a card offers to record. One click. Both sides of the call are transcribed on your computer, and when it ends everything from the call is on the clipboard.
⌘⇧M
10:15
Two projects at once
⌥⌘1 puts Focus on Checkout redesign. Screenshots and notes go there. A recruiter calls back; ⌘⇧J flips Focus to Hiring for a voice note, and again to flip back.
⌥⌘1 · ⌘⇧J
11:40
A bug, shown not described
A tester records a walkthrough of the failing checkout, narrating as they go. Each click gets a ring, card numbers are blurred, and what they complain about lands in Issues with their words.
⌘⇧U
14:00
Hand it to Claude Code
⌘⇧H twice and paste. The prompt over the latest recording is already set to fix what was raised. Claude Code reads the pack, reproduces the bug from the “What I did” steps, and logs the fix back to the topic with
add_note.⌘⇧H
Feedback with the picture marked up
Show what is wrong instead of describing it. An agent gets the picture, your marks and your words together.
- In Chrome, choose Feedback from the toolbar button, or right-click the page and choose Give feedback on this page. A screenshot of the page opens in an editor.
- Draw arrows and boxes, add a label, or drop numbered pins with a note on each. Passwords, card fields and email addresses are hidden for you; blur anything else.
- Say whether it is a bug, an idea, a question or praise, and what you expected. Save, take another keeps several shots together as one piece of feedback.
- Hand it off: one prompt for your agent, or a pack with the marked-up pictures, your notes, and the errors the page reported if you switch that on.
On your computer, ⌘⇧SWin+Alt+Shift+SSuper+Alt+Shift+S and drag: a note box opens beside the picture, so your words go with it.

- Mark it up: arrow, box, pen, label, pin, blur, crop.
- What it is: a bug, an idea, a question or praise.
- Pins number themselves, each with its own note.
- Hidden: private fields are found and blurred for you.
- Comes with it: the page, the browser and its window size.
- Save, take another: several shots, one prompt.
Capture from anywhere
Every kind of capture has a global shortcut, so you never leave the app you are in.
- Press a shortcut. ⌘⇧S grabs part of the screen, ⌘⇧V records a voice note, ⌘⇧T opens a note box at the pointer.
- A card at the top right confirms it, shows where it went, and fades.
- Links keep their page title, clipped text keeps where it came from, and the text in screenshots is read on your computer.
- ⌘⇧K searches every word of it later.

- Capture bar: hold ⌘⇧ and press the letter.
- Capture from any app: works in every app.
- Focus: ⌘⇧J and ⌥⌘1–9.
- Hand it to an AI: ⌘⇧H for a prompt, ⌘⇧Y for a path.

Every default shortcut
| macOS | Windows | Linux | What it does |
|---|---|---|---|
| ⌘⇧S | Win+Alt+Shift+S | Super+Alt+Shift+S | Screenshot. |
| ⌘⇧V | Win+Alt+Shift+V | Super+Shift+V | Voice note. |
| ⌘⇧T | Win+Alt+Shift+T | Super+Shift+T | Quick note. |
| ⌘⇧M | Win+Alt+Shift+M | Super+Shift+M | Record a meeting. |
| ⌘⇧L | Win+Shift+O | Super+Shift+L | Capture a link. |
| ⌘⇧E | Win+Shift+E | Super+Shift+E | Clip selected text. |
| ⌘⇧K | Win+Shift+K | Super+Shift+K | Command palette. |
| ⌘⇧J | Win+Shift+J | Super+Shift+J | Next Focus topic. |
| ⌥⌘1–9 | Ctrl+Alt+Shift+1–9 | Super+Alt+1–9 | Focus a pinned topic. |
| ⌘⇧U | Win+Shift+U | Super+Shift+U | Start or stop a walkthrough. |
| ⌥⌘⇧U | Win+Alt+Shift+U | Super+Alt+Shift+U | Pause or resume a walkthrough. |
| ⌘⇧Y | Win+Shift+Y | Super+Shift+Y | Copy the last capture’s path. |
| ⌘⇧H | Win+Shift+H | Super+Shift+H | Hand off recent recordings. |
| ⌥⌘⇧Y | Win+Alt+Shift+Y | Super+Alt+Shift+Y | Copy this group’s pack path. |
Focus: say what you are on, once
Focus is the topic you are working on right now. While it is set, every capture goes there without asking.
- Pick a topic in the sidebar, or pin it and press ⌥⌘1 to ⌥⌘9 (Windows and Linux have their own keys for these, off until you switch them on).
- ⌘⇧J steps through recent topics, most recent first, so one press flips back, like ⌘Tab or Alt+Tab.
- Focus shows in the sidebar, the note box and the menu bar or system tray, so you always know where the next capture lands.
- Change Focus mid-meeting and the meeting is split at that moment, each part filed to its own topic. A voice note goes whole to the topic in Focus when you save it.

- In Focus: new captures land here.
- Pin it to ⌥⌘1–9.
- Hand off: a prompt over this topic.
- Rules and Agent access live with each topic.
⌥⌘1   Focus: Checkout redesign
⌘⇧S   Screenshot   → Checkout redesign
⌘⇧V   Voice note   → Checkout redesign
⌘⇧J   Focus: Hiring           the topic before
⌘⇧T   Quick note   → Hiring
⌘⇧J   Focus: Checkout redesign
⌘⇧M   Meeting      → Checkout redesign
       Focus moves at 12:10, mid-call:
       part 1 → Checkout redesign · part 2 → Hiring
Captures group themselves
Captures close together become one group, with one pack folder. There is nothing to start or stop.
- A break of 20 minutes, or moving Focus to another topic, starts the next one.
- Meetings and walkthroughs get groups of their own.
- Every group is written to disk as a context pack. ⌥⌘⇧Y copies the current one’s path.
09:12               Checkout redesign   6 captures
09:30  Meeting      Checkout redesign   1 recording
10:15               Hiring              2 captures   Focus moved
11:40  Walkthrough  Demo Shop           5 steps
15:40               Checkout redesign   3 captures   after a break
Sorting that tells you why
Captures made with no Focus find their topic in three layers, and every decision says why.
- Your rules file for certain: a web address, an app, a window title or a keyword. Anything from
*.stripe.comgoes to Billing. - On-device similarity compares the capture with each topic. It files only when the match is clearly strong and shares a distinctive word; otherwise it suggests.
- You accept a suggestion in Unsorted with one key, or dismiss it.
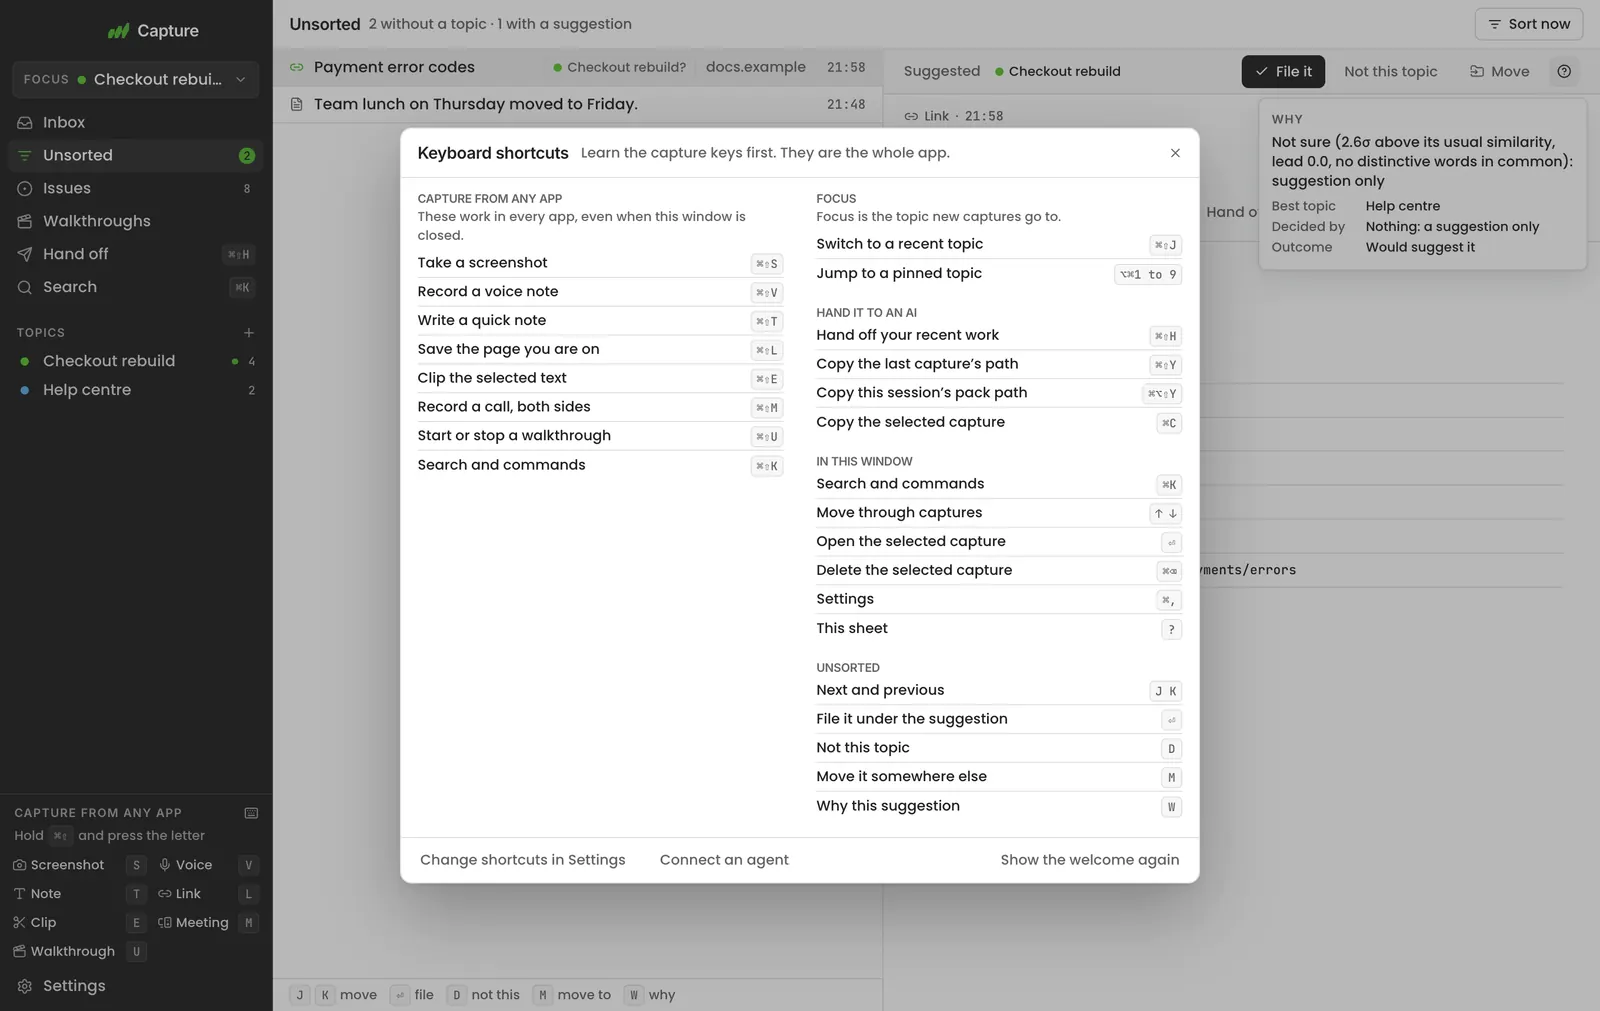
- The suggestion, marked with a question mark.
- File it (Return) or Not this (D).
- Why: how strong, and which words it shares.
- All from the keyboard: J K, Return, D, M, W.
Meetings, transcribed on your computer
Record a call as two tracks, get a transcript with names, and keep the audio on your computer.
- ⌘⇧M, or accept the card that appears when a meeting app starts using the mic.
- Your microphone and the call audio are recorded separately. No bot joins the call.
- It is transcribed on your computer: by Apple’s own transcriber on macOS 26 and later, by Whisper everywhere else. Nothing is uploaded.
- Voices are told apart (on Windows and Linux, after the optional Speaker names download). Name one once and it is recognised next time; your own becomes Me.
**Me** · 00:12
Can we ship the new checkout behind the flag first?

**Priya** · 00:19
Yes. I'd rather watch the decline rate for a week.

**Voice 3** · 00:31
I can pull the numbers from Stripe on Friday.
Walkthroughs: show it once, narrated
Press ⌘⇧U, Return, and talk through what is on your screen. You get the steps, every click and everything you said.
- ⌘⇧U opens a small panel over the app you are in: the whole screen or one window, or on macOS one app. Keystrokes are never read.
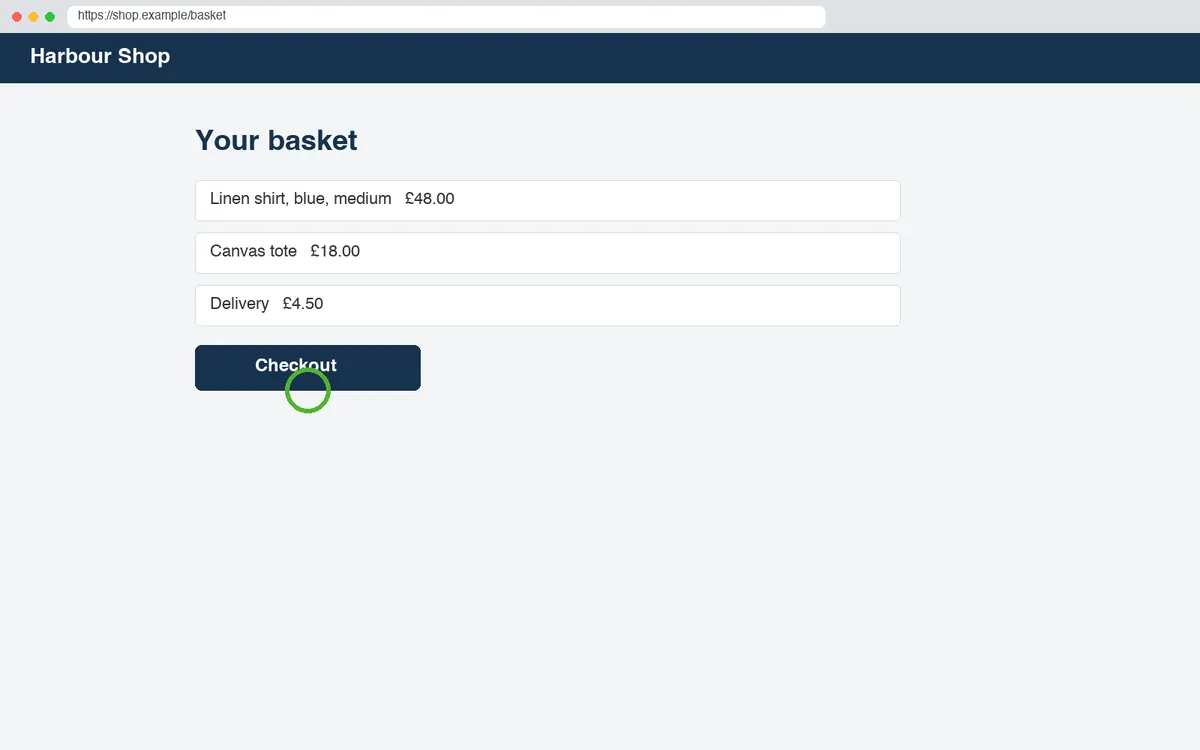
- A green ring shows at each logged click, on screen and in the video. The indicator shows your last action and, if you like, your words as you say them. Say “mark that” to add a step.
- A screenshot is taken when the page, app or screen changes, and when you click. Typing and terminal output don’t fire steps, and near-duplicates are left out of the pack.
- Screenshots in the pack carry a ring where you clicked, and steps.md has the text on screen, so an agent with no vision can follow too. Emails, card numbers and phone numbers are blurred. Check it, then share a link or a zip.

- Hand off: a prompt, the transcript, images or the path.
- Check the topic, screenshots, blurs and voices.
- Stages: one app or page at a time.
- Clicks and screenshots sit between your words.


Voice notes that know what was on screen
Every recording keeps its context, not only walkthroughs. A finished voice note lands on your clipboard with all of it, as text.
- While a voice note or meeting records, the app notes clicks and the app, window, page or file in front, and saves a screenshot when the screen changes. There is no video unless it’s a walkthrough.
- A screenshot or note carries the last two minutes of what you did. They are held in memory, and only reach the disk when a capture uses them.
- The toast offers smaller copies too: just the words, the pack path, or a prompt for Claude Code.
- For one recording, the screen icon on its panel stops screenshots. It all stays on your computer.
## 00:46–01:17 · Google Chrome · Payment (shop.example)
**Sam** · 00:47
Now the card details, I'll press pay now.
_00:56 · Clicked "Pay now"_

**Sam** · 00:58
Okay, so that's wrong, the payment failed with a test card that should work.Issues and a brief for every topic
Most of what people say while recording is feedback. The app notices, and keeps it with the words and the moment.
- Bugs, requests, ideas, questions and decisions are picked out by free rules, each with your exact words, its time, the stage and the nearest screenshot.
- An on-device model writes the one-line titles: Apple’s, on a Mac that has it, or the optional Smart titles download on Windows and Linux. With your own OpenRouter key, you can turn on cloud help too. Quotes must match the transcript, or they are dropped.
- A topic rolls them up: repeats across recordings are marked, and its Brief says where things stand and what to do next. Mark items done or edit them; your changes stick.
- Words it keeps mishearing? Select one on the Check screen and choose Always correct this. The raw transcript is kept.

## Issues (2)

- **Payment failed with test card. Basket emptied. Bug**
  > Okay, so that's wrong, the payment failed with a test card that should work.
  `00:58` · Google Chrome, https://shop.example/checkout/payment · [screenshot 4](<steps/004.png>)
  On screen: “Payment failed”, “Your card was declined.”
Hand-off prompts: one paste, all the context
One prompt with the instructions, what happened and the paths to read, so an agent can start straight away. For one capture it is two keys.
- Press H on any capture, or Hand off on its card or toast. The goal that suits it is already picked, fix these issues when you raised something, and the prompt is showing. Return copies it.
- ⌘⇧H from any app opens a panel at the pointer on your latest recording and your last goal. Press it again, or Return, and the prompt is on your clipboard.
- For several at once, the Hand off view asks which recordings (today, a topic, the latest few) and what the agent should do, and shows the whole prompt and its size first.
- The same prompt is always on disk as HANDOFF.md, in the library and each topic, so an agent can start from a folder.


Context packs: folders an agent can read
Every session and walkthrough is also a plain folder on your computer, written for an agent to read first.
- When a session ends or a walkthrough is reviewed, its folder is written to ~/Startwell Capture, one folder per topic.
- The README says what it is, who spoke, what was raised, and lists What I did as numbered repro steps.
- transcript.md has every word, told stage by stage with clicks and screenshots; steps.md pairs each screenshot with what was said and the text on screen; issues.md lists what was raised.
- Each topic gets a TOPIC.md brief and a HANDOFF.md prompt. Paste a path into Claude Code and it has the whole story.
- ~/Startwell Capture/
- Demo Shop/one folder per topic, with TOPIC.md and HANDOFF.md
- 2026-11-03 1402 Demo card declined at checkout/
- README.mdstart here
- transcript.mdevery word, with activity
- steps.mdeach step: page, words, screen text
- steps/001.png … 005.pngring at the click, blurred where needed
- issues.mdwhat was raised, with quotes
- manifest.jsonthe same, as JSON
# Demo: card declined at checkout

## What I did

1. Opened Google Chrome at demoshop.example/basket · 00:00 → [step 1](steps/001.png)
2. Clicked menu "Quantity" in "Blue mug" · 00:09 → [step 2](steps/002.png)
3. Clicked link "Go to checkout" · 00:16
4. Went to demoshop.example/checkout — "Checkout — Demo Shop" · 00:17 → [step 3](steps/003.png)
5. Clicked into field "Card number" · 00:36 → [step 4](steps/004.png)
6. Clicked "Pay now" · 00:45
7. Went to demoshop.example/checkout/payment — "Payment failed — Demo Shop" · 00:51 → [step 5](steps/005.png)
**Jo** · 00:09
I'll make it two.

_00:16 · Clicked link "Go to checkout"_
_00:17 · Navigated to demoshop.example/checkout — "Checkout — Demo Shop"_

**Jo** · 00:51
I think it's the postcode. It has a space in it.
The clipboard does the hand-off
When a capture is ready, the most useful thing to paste into an agent is already on your clipboard.
- A voice note gives your words on their own, with everything else in one context file you can attach. Every other capture copies everything in text as one paste: the words, clicks, pages and links, the text read from the screen, and the path of every screenshot. Copy all context gives everything from any capture, group or topic. What is kept.
- The card says what was copied, with the paste key as a reminder.
- ⌘⇧H copies a hand-off prompt; ⌘⇧Y, the last capture’s path; ⌥⌘⇧Y, this group’s pack.
- Paste it into Claude Code or any agent that reads text.

- What is on your clipboard now.
- ⌘V: paste it into your agent.
> Read "~/Startwell Capture/Demo Shop/2026-11-03 1402 Demo card declined at checkout/README.md"
  and fix the bug it shows.

Claude Code opens README.md, then steps.md and the screenshots it links.
Agent access: your whole library over MCP
One local MCP connection lets Claude Code, or any agent that speaks MCP, read your library and write back while it works.
- Open Settings, Agent access and click Set up Claude Code, or copy the setup for Cursor, VS Code, Codex or anything else. Test connection does what an agent does.
- The agent can list topics and issues, get a topic’s context, search, open captures and packs, get a hand-off prompt, and add a note.
- It answers only on this computer, turns web pages away, and asks for a key made for this install, which is in the setup you copy.
- For a repo that should see one topic, a topic’s Agent access tab has Connect a project: it adds the topic to
.mcp.json, keeping what is there, and writes a short skill. - Or hand it the whole job: the Startwell Capture skill, for Claude Code, Codex, Cursor and any agent that reads skills, takes a folder of recordings, separates the tasks, and investigates, builds and tests each one with subagents, then tells you what shipped.
claude mcp add --transport http --scope user startwell-capture http://127.0.0.1:43127/mcp --header "Authorization: Bearer <your key>"

→ search_topic
{ "query": "postcode" }

← result
2 result(s):
- [k3Fq…] Demo: card declined at checkout — …the postcode. It has a space…
- [p9Lm…] Note — Repro: postcode "SW1A 1AA" is declined, "SW1A1AA" goes through.

Use get_capture for full content.
On your computer by default
Everything is recorded, transcribed, read and sorted on your computer. There is no account and no sync.
- Captures live in the app’s own data folder and packs in Startwell Capture in your home folder. We cannot see them.
- Titles and one-liners are written by an on-device model, free: Apple’s on a Mac that has it, or an optional download on Windows and Linux. Cloud AI is optional and uses your own OpenRouter key. Without one, everything works except AI summaries, digests and topic memory.
- A walkthrough leaves your computer only if you upload it for a share link.
Stays on your computer
- Screenshots, recordings and notes
- Transcription and speaker recognition
- Reading text in screenshots
- Sorting and search
- Activity lines and redaction
- Issues and topic briefs
- Context packs and the MCP server
Leaves only if you choose
- AI requests, to OpenRouter, with your key
- A walkthrough you upload for a share link
- Topic outputs you set up yourself
The app also checks our server for updates.
Free. No account, no licence key, no trial.
Startwell Capture is made by Startwell Ventures for our own work and the people we test with. It updates itself.
curl -fsSL https://capture.startwellventures.com/install.sh | bash
It downloads the latest version, checks it, and puts Startwell Capture in Applications. Before macOS 26 it also fetches the speech model. Run it again any time to update. Read the script first, or download the .dmg.
irm https://capture.startwellventures.com/install.ps1 | iex
It downloads the latest version, checks it, installs Startwell Capture for you (no administrator needed) and fetches the speech model. Run it again any time to update. Read the script first, or download the installer.
curl -fsSL https://capture.startwellventures.com/install.sh | bash
It downloads the latest version, checks it, installs the .deb on Ubuntu and Debian or the AppImage anywhere else, and fetches the speech model. Needs glibc 2.39 or later: Ubuntu 24.04, Debian 13, Fedora 40 or newer. Run it again any time to update. Read the script first, or download the .deb or the AppImage.